【Docker】之Harbor私有镜像仓库
安装harbor之前先安装docker
准备
禁用iptables和firewalld服务
[root@master ~]# systemctl stop firewalld
[root@master ~]# systemctl disable firewalld
[root@master ~]# systemctl stop iptables
[root@master ~]# systemctl disable iptables
[root@master ~]#  iptables -F  #清空防火墙规则
禁用selinux
[root@master ~]# setenforce 0 #临时
[root@master ~]# sed -i '/SELINUX/s/enforcing/disabled/' /etc/selinux/config *#永久关闭
修改主机名
[root@master ~]# hostnamectl set-hostname harbor
[root@harbor ~]# hostname
harbor
安装基础软件包
[root@harbor ~]# yum install -y wget net-tools nfs-utils lrzsz gcc gcc-c++ make cmake libxml2-devel openssl-devel curl curl-devel unzip sudo ntp libaio-devel wget vim ncurses-devel autoconf automake zlib-devel python-devel epel-release openssh-server socat ipvsadm conntrack安装docker-ce
[root@harbor ~]# yum-config-manager --add-repo http://mirrors.aliyun.com/docker-ce/linux/centos/docker-ce.repo配置docker-ce国内yum源(阿里云)
[root@harbor ~]# yum-config-manager --add-repo http://mirrors.aliyun.com/docker-ce/linux/centos/docker-ce.repo 安装docker依赖包
[root@harbor ~]# yum install -y yum-utils device-mapper-persistent-data lvm2安装docker-ce
[root@harbor ~]# yum install docker-ce -y启动服务
[root@harbor ~]#  systemctl start docker && systemctl enable docker
[root@harbor ~]#  systemctl status docker
● docker.service - Docker Application Container Engine
   Loaded: loaded (/usr/lib/systemd/system/docker.service; enabled; vendor preset: disabled)
   Active: active (running) since 二 2023-06-20 00:07:12 CST; 11h ago
     Docs: https://docs.docker.com
 Main PID: 46686 (dockerd)
    Tasks: 50
   Memory: 63.8M
CGroup: /system.slice/docker.service 看到running,表示docker正常运行
查看docker版本
[root@harbor ~]# docker version安装docker-compose (主要用于harbor安装和管理)
[root@harbor ~]# sudo curl -L https://get.daocloud.io/docker/compose/releases/download/1.21.1/docker-compose-`uname -s`-`uname -m` -o /usr/bin/docker-compose
[root@harbor ~]# chmod +x /usr/bin/docker-compose
[root@harbor ~]# docker-compose version

注:
docker-compose项目是Docker官方的开源项目,负责实现对Docker容器集群的快速编排。
docker-compose的工程配置文件默认为docker-compose.yml,
docker-compose运行目录下的必要有一个docker-compose.yml。
docker-compose可以管理多个docker实例
开启包转发功能和修改内核参数
内核参数修改:br_netfilter模块用于将桥接流量转发至iptables链,br_netfilter内核参数需要开启转发。
[root@harbor ~]#  modprobe br_netfilter
[root@harbor ~]#  cat > /etc/sysctl.d/docker.conf <<EOF
net.bridge.bridge-nf-call-ip6tables = 1
net.bridge.bridge-nf-call-iptables = 1
net.ipv4.ip_forward = 1
EOF
[root@harbor ~]# sysctl -p /etc/sysctl.d/docker.conf

注:
Docker 安装后出现:WARNING: bridge-nf-call-iptables is disabled 的解决办法:
net.bridge.bridge-nf-call-ip6tables = 1
net.bridge.bridge-nf-call-iptables = 1

net.ipv4.ip_forward = 1:
将Linux系统作为路由或者VPN服务就必须要开启IP转发功能。当linux主机有多个网卡时一个网卡收到的信息是否能够传递给其他的网卡 如果设置成1的话 可以进行数据包转发,可以实现VxLAN 等功能。不开启会导致docker部署应用无法访问。

#重启docker
[root@harbor ~]#  systemctl restart docker
为Harbor自签发证书
路径
[root@harbor ~]# mkdir /data/ssl -p
[root@harbor ~]# cd /data/ssl/
生成ca证书
[root@harbor ssl]#  openssl genrsa -out ca.key 3072
#生成一个3072位的key,也就是私钥
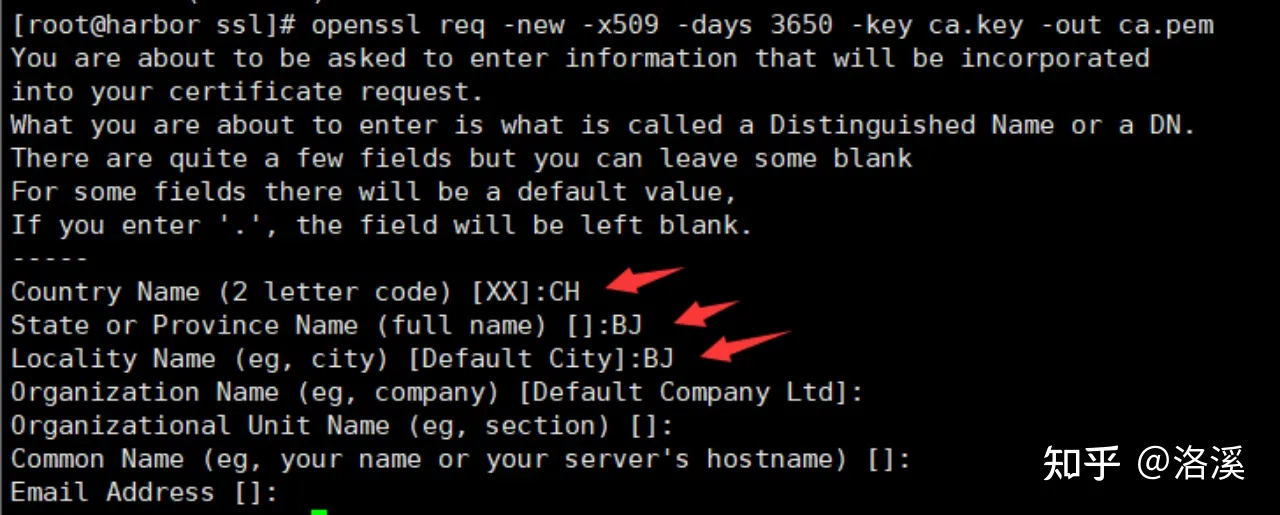
[root@harbor ssl]#  openssl req -new -x509 -days 3650 -key ca.key -out ca.pem
#生成一个数字证书ca.pem,3650表示证书的有效时间是3年,按箭头提示填写即可,没有箭头标注的为空:
生成域名的证书
[root@harbor ssl]# openssl genrsa -out harbor.key  3072
#生成一个3072位的key,也就是私钥
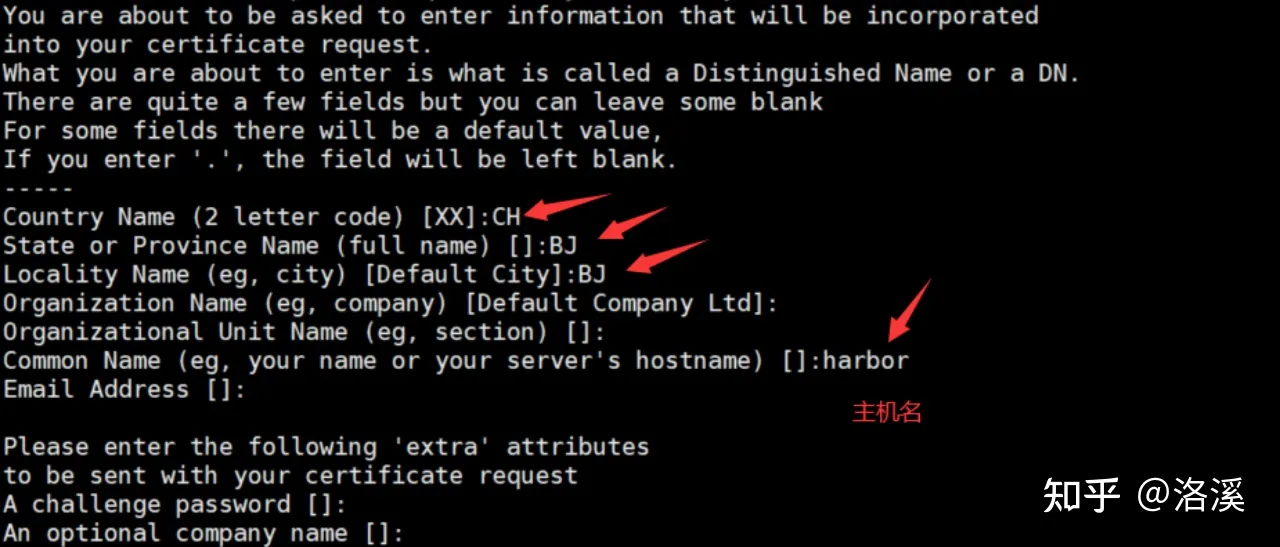
[root@harbor ssl]# openssl req -new -key harbor.key -out harbor.csr
#生成一个证书请求,一会签发证书时需要的,标箭头的按提示填写,没有箭头标注的为空:
签发证书
[root@harbor ssl]# openssl x509 -req -in harbor.csr -CA ca.pem -CAkey ca.key -CAcreateserial -out harbor.pem -days 3650
#显示如下,说明证书签发好了:
Signature ok
subject=/C=CH/ST=BJ/L=BJ/O=Default Company Ltd/CN=harbor
Getting CA Private Key
安装Harbor
下载harbor
[root@harbor ~]# cd /opt
[root@harbor opt]# wget https://github.com/goharbor/harbor/releases/download/v2.8.2/harbor-offline-installer-v2.8.2.tgz
解压包,并修改配置文件
[root@harbor opt]# tar xvf harbor-offline-installer-v2.8.2.tgz
[root@harbor opt]# cd harbor && cp harbor.yml.tmpl harbor.yml
[root@harbor harbor]# vim harbor.yml
hostname: reg.mydomain.com 修改为hostname: harbor
  certificate: /your/certificate/path 修改为  certificate: /data/ssl/harbor.pem
  private_key: /your/private/key/path 修改为  private_key: /data/ssl/harbor.key
安装harbor
[root@harbor harbor]# ./install.sh

Note: docker version: 24.0.2

[Step 1]: checking docker-compose is installed ...

Note: Docker Compose version v2.18.1

[Step 2]: loading Harbor images ...
Loaded image: goharbor/harbor-log:v2.8.2
Loaded image: goharbor/harbor-db:v2.8.2
Loaded image: goharbor/registry-photon:v2.8.2
Loaded image: goharbor/harbor-core:v2.8.2
Loaded image: goharbor/harbor-jobservice:v2.8.2
Loaded image: goharbor/harbor-registryctl:v2.8.2
Loaded image: goharbor/notary-signer-photon:v2.8.2
Loaded image: goharbor/trivy-adapter-photon:v2.8.2
Loaded image: goharbor/prepare:v2.8.2
Loaded image: goharbor/harbor-portal:v2.8.2
Loaded image: goharbor/redis-photon:v2.8.2
Loaded image: goharbor/harbor-exporter:v2.8.2
Loaded image: goharbor/nginx-photon:v2.8.2
Loaded image: goharbor/notary-server-photon:v2.8.2

作者:洛溪
链接:https://www.zhihu.com/question/605667299/answer/3116890567
来源:知乎
著作权归作者所有。商业转载请联系作者获得授权,非商业转载请注明出处。

[Step 3]: preparing environment ...

[Step 4]: preparing harbor configs ...
prepare base dir is set to /root/harbor
Generated configuration file: /config/portal/nginx.conf
Generated configuration file: /config/log/logrotate.conf
Generated configuration file: /config/log/rsyslog_docker.conf
Generated configuration file: /config/nginx/nginx.conf
Generated configuration file: /config/core/env
Generated configuration file: /config/core/app.conf
Generated configuration file: /config/registry/config.yml
Generated configuration file: /config/registryctl/env
Generated configuration file: /config/registryctl/config.yml
Generated configuration file: /config/db/env
Generated configuration file: /config/jobservice/env
Generated configuration file: /config/jobservice/config.yml
loaded secret from file: /data/secret/keys/secretkey
Generated configuration file: /compose_location/docker-compose.yml
Clean up the input dir


Note: stopping existing Harbor instance ...
[+] Running 10/10
 ✔ Container nginx              Removed                                                                          0.1s
 ✔ Container harbor-jobservice  Removed                                                                          0.1s
 ✔ Container registryctl        Removed                                                                          0.0s
 ✔ Container harbor-core        Removed                                                                          0.0s
 ✔ Container harbor-portal      Removed                                                                          0.0s
 ✔ Container registry           Removed                                                                          0.0s
 ✔ Container redis              Removed                                                                          0.0s
 ✔ Container harbor-db          Removed                                                                          0.0s
 ✔ Container harbor-log         Removed
 ✔ Network harbor_harbor        Removed


[Step 5]: starting Harbor ...
[+] Building 0.0s (0/0)
[+] Running 10/10
 ✔ Network harbor_harbor        Created                                                                          0.1s
 ✔ Container harbor-log         Started                                                                          0.5s
 ✔ Container registryctl        Started                                                                          2.0s
 ✔ Container harbor-portal      Started                                                                          2.1s
 ✔ Container redis              Started                                                                          2.2s
 ✔ Container harbor-db          Started                                                                          2.1s
 ✔ Container registry           Started                                                                          1.9s
 ✔ Container harbor-core        Started                                                                          2.3s
 ✔ Container harbor-jobservice  Started                                                                          2.7s
 ✔ Container nginx              Started                                                                          2.9s
✔ ----Harbor has been installed and started successfully.----
至此安装成功.
查看harbor服务状态
[root@harbor harbor]# docker-compose ps

Name                     Command                  State                             Ports
----------------------------------------------------------------------------------------------------------------------
harbor-core         /harbor/entrypoint.sh            Up (healthy)
harbor-db           /docker-entrypoint.sh  13        Up (healthy)
harbor-jobservice   /harbor/entrypoint.sh            Up (healthy)
harbor-log          /bin/sh -c /usr/local/bin/ ...   Up (healthy)   127.0.0.1:1514->10514/tcp
harbor-portal       nginx -g daemon off;             Up (healthy)
nginx               nginx -g daemon off;             Up (healthy)   0.0.0.0:80->8080/tcp,:::80->8080/tcp,
                                                                    0.0.0.0:443->8443/tcp,:::443->8443/tcp
redis               redis-server /etc/redis.conf     Up (healthy)
registry            /home/harbor/entrypoint.sh       Up (healthy)
registryctl         /home/harbor/start.sh            Up (healthy)
服务都是正常的
遇到的错误 Network harbor_harbor Error
#按照文档按照不会有这个报错,我是安装好docker之后,再关闭防火墙,遇到了这个报错
 ✘ Network harbor_harbor  Error                                                                                  0.0s
failed to create network harbor_harbor: Error response from daemon: Failed to Setup IP tables: Unable to enable SKIP DNAT rule:  (iptables failed: iptables --wait -t nat -I DOCKER -i br-4733c61275a3 -j RETURN: iptables: No chain/target/match by that name.


#方法
#这是因为在启动docker的时候防火墙做了策略,如果容器在运行中,停止防火墙,在操作容器就会报这个错误,我们可以重启docker解决此问题

systemctl restart docker.service
#然后
docker-compose up -d在自己电脑修改hosts文件
在hosts文件添加如下一行,然后保存即可
192.168.5.135  harbor
如何停掉harbor
[root@harbor harbor]# cd /opt/harbor
[root@harbor harbor]# docker-compose stop
如何启动harbor
[root@harbor harbor]# cd /opt/harbor
[root@harbor harbor]# docker-compose up -d #docker start启动,有时候nginx启动失败
Harbor 图像化界面使用说明
在浏览器输入:https://harbor

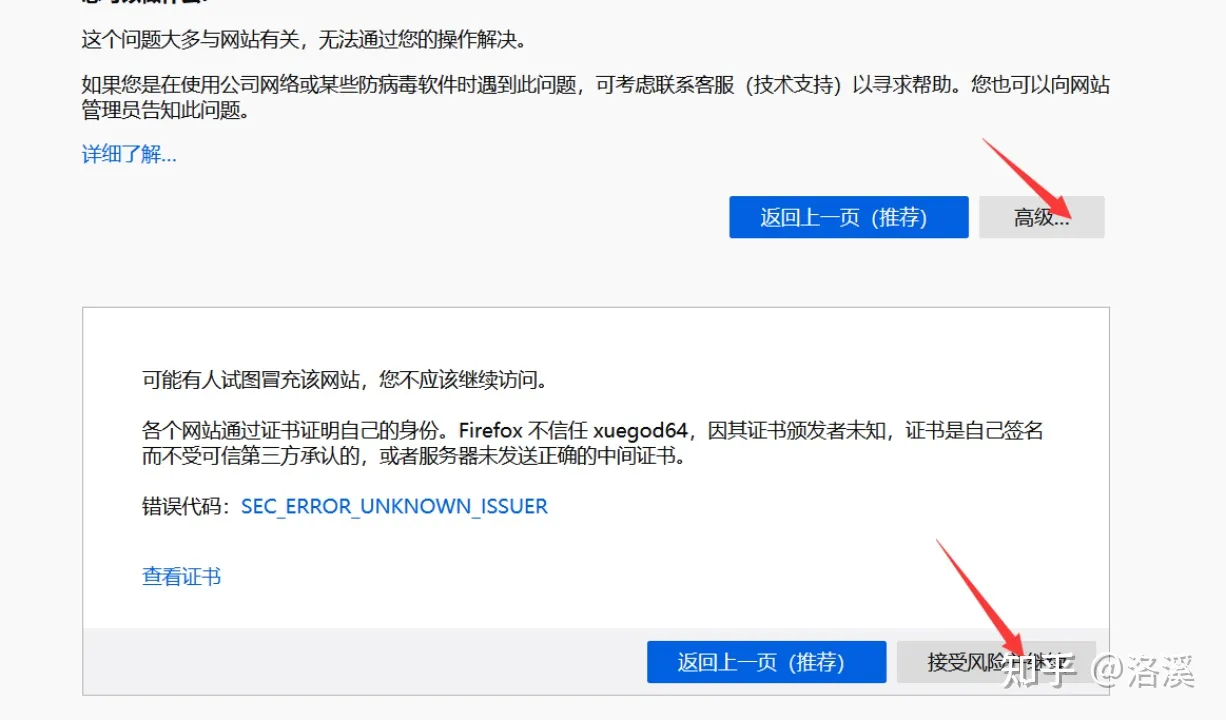
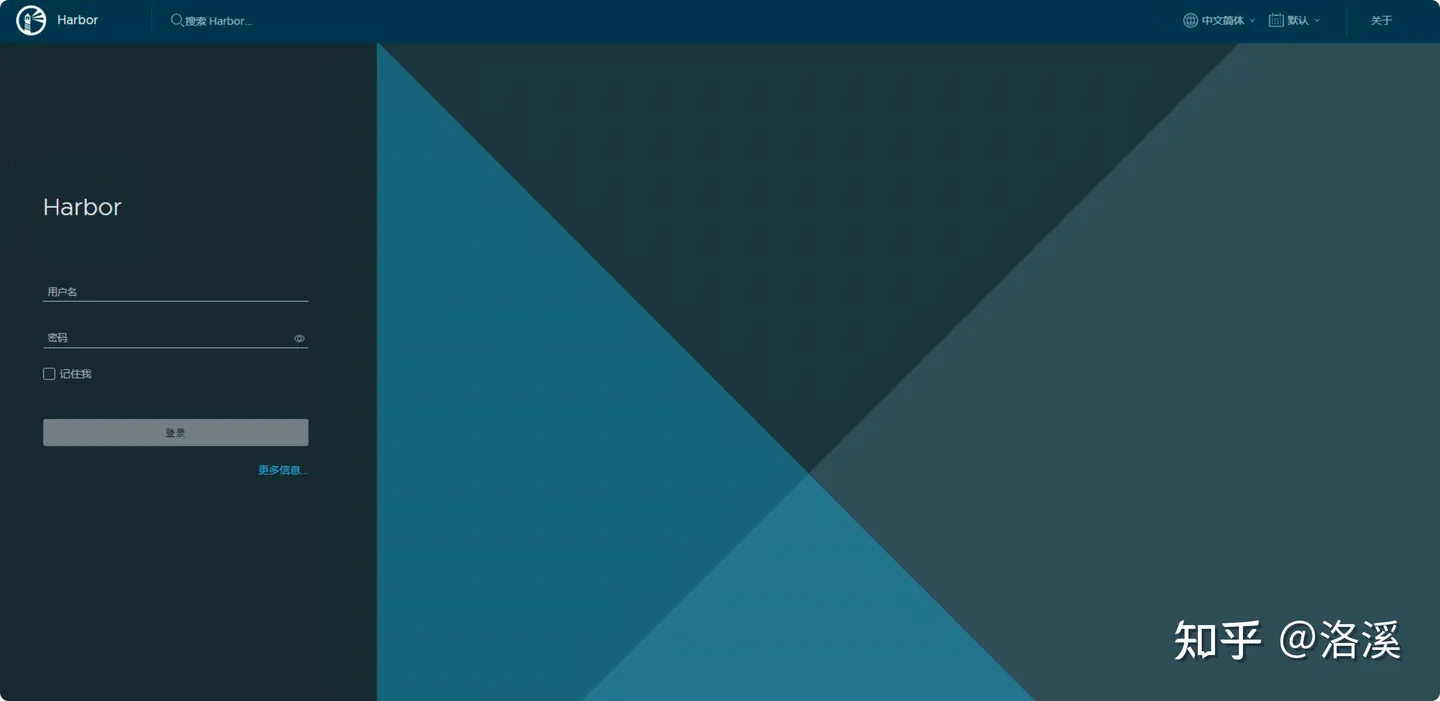
接收风险并继续,出现如下界面,说明访问正常

账号:admin
密码:Harbor12345
输入账号密码出现如下

所有基础镜像都会放在library里面,这是一个公开的镜像仓库
新建项目->起个项目名字test(把访问级别公开那个选中,让项目才可以被公开使用)


测试使用harbor私有镜像仓库
修改docker配置,并重启docker
[root@harbor ~]# vim /etc/docker/daemon.json
{  "registry-mirrors": ["https://registry.docker-cn.com","https://docker.mirrors.ustc.edu.cn","http://hub-mirror.c.163.com"],
"insecure-registries": ["192.168.5.135","harbor"] #表示我们内网访问harbor的时候走的是http,192.168.5.135是安装harbor机器的ip
}
[root@harbor ~]# systemctl daemon-reload && systemctl restart docker
[root@harbor ~]# systemctl status docker
#显示如下,则说明启动成功了
Active: active (running) since 二 2023-06-20 00:07:12 CST; 10h ago
命令行docker登录harbor(如果你有其他docker机器,可以内网远程登录)
[root@harbor ~]# docker login 192.168.5.135
Username: admin
Password: Harbor12345
WARNING! Your password will be stored unencrypted in /root/.docker/config.json.
Configure a credential helper to remove this warning. See
https://docs.docker.com/engine/reference/commandline/login/#credentials-store

Login Succeeded
#登录成功
docker 拉取tomcat镜像
[root@harbor ~]#docker pull tomcat
Using default tag: latest
latest: Pulling from library/tomcat
0e29546d541c: Pull complete
9b829c73b52b: Pull complete
cb5b7ae36172: Pull complete
6494e4811622: Pull complete
668f6fcc5fa5: Pull complete
dc120c3e0290: Pull complete
8f7c0eebb7b1: Pull complete
77b694f83996: Pull complete
0f611256ec3a: Pull complete
4f25def12f23: Pull complete
Digest: sha256:9dee185c3b161cdfede1f5e35e8b56ebc9de88ed3a79526939701f3537a52324
Status: Downloaded newer image for tomcat:latest
docker.io/library/tomcat:latest


#把tomcat镜像打标签
[root@harbor ~]# docker tag tomcat:latest  192.168.5.135/test/tomcat:v1
#执行上面命令就会把192.168.5.135/test/tomcat:v1上传到harbor里的test项目下
[root@harbor ~]# docker push 192.168.5.135/test/tomcat:v1
#执行上面命令就会把192.168.5.135/test/tomcat:v1上传到harbor里的test项目下
The push refers to repository [192.168.5.135/test/tomcat]
3e2ed6847c7a: Pushed
bd2befca2f7e: Pushed
59c516e5b6fa: Pushed
3bb5258f46d2: Pushed
832e177bb500: Pushed
f9e18e59a565: Pushed
26a504e63be4: Pushed
8bf42db0de72: Pushed
31892cc314cb: Pushed
11936051f93b: Pushed
v1: digest: sha256:e6d65986e3b0320bebd85733be1195179dbce481201a6b3c1ed27510cfa18351 size: 2422
打开harbor控制台,查看

从harbor仓库下载镜像
# 在harbor机器上删除镜像
[root@harbor ~]# docker rmi -f 192.168.5.135/test/tomcat:v1
Untagged: 192.168.5.135/test/tomcat:v1
Untagged: 192.168.5.135/test/tomcat@sha256:e6d65986e3b0320bebd85733be1195179dbce481201a6b3c1ed27510cfa18351
#从harbor仓库再次拉取镜像
[root@harbor ~]# docker pull 192.168.5.135/test/tomcat:v1
v1: Pulling from test/tomcat
Digest: sha256:e6d65986e3b0320bebd85733be1195179dbce481201a6b3c1ed27510cfa18351
Status: Downloaded newer image for 192.168.5.135/test/tomcat:v1
192.168.5.135/test/tomcat:v1

#从自己的harbor拉取镜像,速度是很畅快的